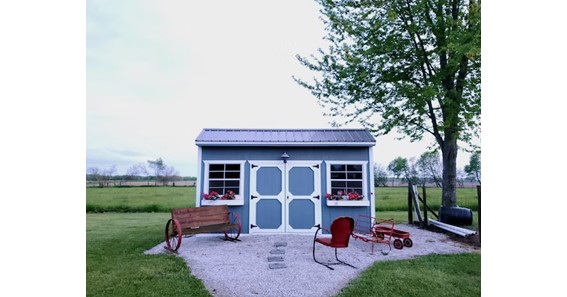
Building a garden shed with a slanted roof can be a great way to add extra storage space to your backyard. It’s an easy project that doesn’t require much experience in construction. Plus, it’s something you can complete in a matter of days.
A garden shed with a slanted roof provides an excellent opportunity to safely store your tools and equipment. It protects your things from the elements and offers tons of other benefits.
A slanted roof allows rainwater to run off quickly and effectively, preventing water from accumulating and causing damage to the ceiling or the shed’s contents. A sloping roof also helps prevent water from seeping through the roof, which can lead to leaks and moisture damage.
If you plan to use your garden shed to store plants requiring good ventilation, installing a slanted roof keeps the shed cooler during hot weather. The slanted roof also means more headroom than a flat roof, especially in the areas close to the walls. This can be particularly beneficial if you want to use the shed as a workspace or storage area.
Materials and Tools for Building the Garden Shed
Before building your garden shed, you must have all the necessary materials and tools. This section will cover the key materials and tools required to construct your garden shed with a slanted roof.
Measuring Tools
Accurate measurements are crucial when building a garden shed. Without precise measurements, the shed may not fit together properly, and the roof may not have the necessary slope to shed water effectively. This can lead to leaks, damage to the shed’s contents, and potentially compromise the overall integrity of the shed.
Here are the measuring tools you’ll need:
- Measuring tape: A measuring tape is essential for measuring distances accurately. You’ll use it to measure the length and width of the shed. You will also need it to measure wall height and roof pitch.
- Square: A square ensures that your corners are square and your measurements are accurate. It’s also helpful for checking the angle of your roof.
- Level: A level will help you ensure that your walls and roof are straight and level. This is important for the stability and appearance of your garden shed.
Wood
Wood is the most critical material for building a garden shed. Note that you would need different wood types for the various parts of the shed.
For example, you should use pressure-treated lumber for the shed’s foundation to prevent rot and decay. You need lumber for the frame in 2x2s, 2x4s, and 2x6s in various lengths. The 2x4s will serve as the rafters of the roof framing. Then, the 2x2s as purlins for your roof’s nailers, while the 2x6s will become the columns for the shed’s structure.
For the siding walls, you would need plywood with ½-inch or ⅝-inch, depending on your local building codes. Of course, you’d also want to cover the plywood’s edges. For this, you would need trim boards. It’s best to use redwood and cedar since they’re more resistant to insects and decay.
Cutting Tools
You’ll also need cutting tools, such as a circular saw: You’ll need this type of saw to cut the framing lumber and plywood to your desired sizes. It’s faster than using the traditional hand saw.
Jigsaws are primarily utilized for cutting shapes and curves in wood. They can also cut through other materials like metal, laminate, and tile. It’s crucial to note that when selecting a jigsaw blade, you should consider the blade’s teeth per inch (TPI). The TPI value represents the number of teeth present on the saw blade. You may also use a miter saw if you want precise angle cuts.
Roofing Material
Choosing the right roofing materials is crucial. You must ensure the structure is durable and weather-resistant while still aesthetically pleasing.
There is no one-size-fits-all answer to which roofing material is best for a garden shed. It depends on your specific needs, preferences, and budget. What’s essential is knowing each roofing material has its own pros and cons.
For example, asphalt shingles are the best option if you want something affordable and easy-to-install. But if you’re looking for a more durable and long-lasting roofing material, metal roofing or clay tiles might be the better choice. Cedar shakes, or shingles could be the way to go if you want a natural and rustic look.
Consider your specific needs, preferences, and weather conditions when choosing the best roofing material for your garden shed.
Finishing Materials
Of course, you’d want to make your shed as aesthetically pleasing as possible. For this, you’ll need finishing materials like paint or stain. You must also have caulk to seal the gaps around the windows, doors, and trim boards.
Click Here – Unlocking Trading Potential: Understanding CFDs and Forex Speculation
DIY Guide to Building a Garden Shed with a Slanted Roof
Let’s dive into the step-by-step process of building a garden shed with a slanted roof.
Planning and Preparation
The first step in building your garden shed is to plan and prepare. Check first if you’re allowed to build a shed in your backyard. Get the necessary permits and make sure to follow the regulations. Then, choose a location where you want to build your garden shed in your backyard. Make sure the ground is level and firm.
Decide on the size and shape of your shed and the location of the door and windows. You can use a pre-made shed plan or design your own. Make a list of all the materials and tools you’ll need, and purchase them before building.
Building the Foundation
The foundation is the most important part of your garden shed. It needs to be level and sturdy to support the weight of your shed.
Dig a trench for the foundation that’s at least 6 inches deep and wider than the size of your shed. Use a tamper to level the ground in the trench. Check the level of the ground using a level tool. Fill the trench with 4 inches of gravel for the gravel base and tamp it down.
Cut pressure-treated lumber to the size of the foundation and build a frame. Secure the corners with screws. Cut a piece of plywood to the size of the frame and attach it with screws. Don’t forget to use a level.
Framing the Walls
Once you’ve built the foundation, you can start framing the walls of your garden shed. Start by cutting the framing lumbers to the desired lengths for the walls. You can build each wall separately. Ensure the walls are straight and level. Proceed to screw the walls to the foundation.
Adding the Slanted Roof
When adding the slanted roof, it’s best to ask the roofing company to provide you with the needed roof size, especially if you’re using metal sheets. Then, prepare the rafters by cutting the 2x6s to the length and angle you need. Secure them to the shed walls. Once everything is in place, you can now add your roofing sheets.
Installing Doors and Windows
With the walls and roof in place, it’s time to install the doors and windows. Use a jigsaw to cut the openings for the doors and windows. Then, install the door and window frames, and secure them with screws. Add trimmings around the doors and windows to give it a finished look.
Finishing the Exterior
Don’t skip on the finishing. Sand the exterior of the shed to remove any rough spots. Then, apply paint or stain to the shed’s exterior, and let it dry completely. To personalize your shed, you can add other accessories, such as hooks and other designs.
Building Interior and Storage
The final step in building a garden shed with a slanted roof is to work on the interior and storage. Here are some of the things you can add inside your garden shed:
- Shelvings: Build shelves inside the shed for storing gardening tools and equipment. You’d want to build the shelves at different heights for your different storage needs.
- Pegboards: Add pegboards to the walls for hanging smaller tools and equipment. Add hooks to make it look organized.
- Lighting: This one is a must-have in your garden shed. Make sure to install lighting that covers the entire space of your shed.
- Workbench: Install a workbench for potting plants or other gardening tasks.
Key Takeaways
Building a garden shed with a slanted roof can be a fun and rewarding project. With the right tools, materials, and knowledge, you can create a beautiful and functional space to store your gardening tools and equipment. Just remember to plan and prepare before you start building, and take your time to ensure that each step is done correctly. Happy building!
- Plan and prepare before you start building.
- Choose a level and firm location, and check local building codes.
- Build a sturdy foundation that’s level and secure.
- Frame the walls and roof with pressure-treated lumber.
- Install doors and windows, and finish the exterior with paint or stain.
- Build shelves, add pegboards, and install lighting and a workbench for the interior and storage.